
Working with the Chess.com API
My journey into programming chess applications started with Chessboard Magic, a personal project that turned into a platform with over 34 unique chess-based applications. This blog continues my Chess Web Programming series, diving into one of the most exciting aspects of modern development: working with APIs. In this installment, we’ll explore the Chess.com API, learn how to interact with it, and create a React application to fetch and display games from any Chess.com user in a structured and beginner-friendly way.
Recap of the Previous Parts
Before we dive into the Chess.com API, here’s a quick recap of the earlier blogs in the series:
- Getting Started: Using
react-chessboardandchess.jsto set up a functional chessboard. - Integrating Stockfish: Enhancing the application by suggesting the best move using Stockfish.
- Deploying Your Application: A guide to hosting your chess application online.
- Customizing the Chessboard: Styling and implementing features like custom piece sets and square highlighting.
- Game Review: Adding features like move highlighting and navigation for game analysis.
- Essential Resources: Tools, libraries, and learning materials to support chess application development.
- Lichess API: Learning how to use the Lichess.org API.
Note: This blog assumes that you’ve followed the previous parts of the series, particularly Blog 1, which covers setting up the foundational tools and concepts. You should already have the necessary software installed (e.g., Node.js, Visual Studio Code) and a basic understanding of React web programming. If you haven’t reviewed Blog 1 yet, we recommend starting there to ensure you’re set up for success.
What Are APIs?
APIs (Application Programming Interfaces) act as intermediaries that allow software applications to communicate with one another. They provide a set of rules and protocols for accessing a service or application’s features or data. For example, when you check the weather on your phone, the app fetches the data from a server using APIs. Similarly, we’ll use the Chess.com API to retrieve chess game data.
What Is a RESTful API?
A RESTful API (Representational State Transfer API) is a type of API that adheres to specific architectural principles. It uses standard HTTP methods such as GET, POST, PUT, and DELETE to manage resources (like game data or user profiles).
RESTful APIs:
- Are stateless, meaning every request from the client to the server must contain all the information needed to process the request.
- Use endpoints (specific URLs) to access different resources.
For instance, the chess.com API uses endpoints to provide access to specific types of data. Here’s an example:
- Endpoint:
https://api.chess.com/pub/player/{username}/games/{year}/{month} - Purpose: Fetches games played by a given Chess.com user.
In this blog, we’ll focus on the Games endpoint to fetch and display a user’s game history.
What Is HTTP?
HTTP (HyperText Transfer Protocol) is the foundation of communication on the web. It defines how messages are formatted and transmitted between clients (like a browser or application) and servers. For example, when your application sends a request to the Chess.com API, it uses HTTP to communicate. Common HTTP methods include:
- GET: Retrieve data from a server.
- POST: Send data to a server.
- PUT: Update data on a server.
- DELETE: Remove data from a server.
The Chess.com API
The Chess.com API is a RESTful API that provides developers access to various chess-related data. It allows you to retrieve information about players, games, tournaments, and more.
Here are some of its key features:
- User Profiles: Fetch details about a specific Chess.com user, including ratings, titles, and membership status.
- Game Archives: Access a player’s monthly game archives, which include all games played during a specific month.
- Clubs and Tournaments: Retrieve details about clubs, tournaments, and events.
For this tutorial, we’ll use the Game Archives endpoint to:
- Fetch a user’s game history for a specific month.
- Include details like the result, time controls, and opening name.
Example Endpoint: Game Archives
To fetch the game archive for a Chess.com user:
https://api.chess.com/pub/player/{username}/games/{year}/{month}For example:
https://api.chess.com/pub/player/hollowleaf/games/2024/11By understanding how endpoints work, you’ll be able to explore other parts of the Chess.com API and integrate additional features into your application in the future.
Setting Up a React Application
In this section, we’ll create a React application from scratch using Create React App. This will serve as the foundation for our Chess.com API integration.
Step 1: Create a New React Application
React is a popular JavaScript library for building user interfaces. To get started, we’ll use a tool called Create React App, which sets up a new project with all the necessary configurations and dependencies pre-installed.
- Open Your Terminal
You’ll need a terminal or command-line tool to run commands. On Windows, you can use Command Prompt or PowerShell. On macOS or Linux, use the built-in terminal. - Run the Create React App Command
In your terminal, typenpx create-react-app chessdotcom-api-app. Thenpxcommand ensures that you’re using the latest version of Create React App, whilechessdotcom-api-appis the name of your project folder. This command downloads and installs all the dependencies required for a React project. It might take a few minutes depending on your internet connection. - Navigate Into Your Project Folder
Once the installation is complete, use thecd chessdotcom-api-appcommand to navigate into the folder where your new React project is located. - What’s Inside the Folder?
Your project folder contains several files and directories:- A
node_modulesfolder with all the dependencies installed for your project. - A
publicfolder that includes static assets like theindex.htmlfile. - A
srcfolder, which is the main location for your React components and logic. - A
package.jsonfile, which lists project metadata and dependencies. - A
README.mdfile, which contains instructions and information about your project.
- A
At this stage, your new React application is ready, and you’re set to begin building your project.
Open the Project in VS Code
Once your React application is created, the next step is to open it in a code editor. We’ll use Visual Studio Code (VS Code), a popular editor for web development.
- Launch VS Code
Open Visual Studio Code from your operating system’s application menu. - Add the Project Folder to Workspace
In VS Code:- Click on File in the top menu bar.
- Select Add Folder to Workspace.
- In the file explorer that appears, navigate to the folder where you created your React project (
chessdotcom-api-app). - Select the folder and click Add.
- Explore the Workspace
Once the folder is added, you’ll see the project structure in the VS Code Explorer panel on the left. Key elements include:srcfolder: This is where you’ll write your React code.publicfolder: Contains theindex.htmlfile, where your React application is injected.package.json: Lists project dependencies and configuration.
- Open the Terminal in VS Code
To run commands directly from VS Code:- Go to the top menu and select View Terminal.
- A terminal window will open at the bottom of the editor, starting in your project folder.
- Verify Everything is Set Up
In the terminal, start the development server by typingnpm start. This will run your React application and open it in your default web browser athttp://localhost:3000.
If you see the default React welcome page in your browser, everything is set up correctly.
Note: If you have another server running on your machine (for example, another React project), you may encounter a message like:
“Something is already running on port 3000.”
In this case, you will be given two options:
- Use a Different Port: React will prompt you to run the application on a different port, such as
http://localhost:3001. You can pressYto confirm.- Shut Down the Other Server: If you prefer to run your application on port 3000, you’ll need to stop the other server. To do this, go to the terminal where the other server is running and press
Ctrl + C(orCmd + Con macOS) to terminate it.
Introducing Material UI
In this section, we’ll enhance the user interface of our React application using Material UI, a popular library of pre-styled and customizable components. Material UI allows us to quickly build professional, modern-looking interfaces without having to write extensive CSS. By the end of this section, we’ll have a clean and responsive form with the following features:
- An input field for the Chess.com username.
- Input fields for the Year and Month.
- A button to trigger the API call and fetch the games.
This form will lay the groundwork for integrating the Chess.com API in the next section.
Why Use Material UI?
Material UI (MUI) is based on Google’s Material Design principles, focusing on clean, consistent, and user-friendly interfaces. Here are some reasons to use it:
- Pre-Styled Components: Includes a library of pre-designed components like buttons, tables, and input fields.
- Customizability: You can easily tweak the styles using inline styling, theming, or CSS overrides.
- Accessibility: Material UI components are built with accessibility in mind, making your application more user-friendly.
- Ease of Use: You can achieve professional designs with minimal effort, reducing the need to write custom CSS.
By using Material UI, we can focus more on building the application logic rather than spending time on UI design from scratch.
Step 1: Install Material UI
To begin using Material UI, we need to install the required packages. These include:
[@mui](/@/mui)/material: The core Material UI component library.[@emotion](/@/emotion)/reactand[@emotion](/@/emotion)/styled: Required for styling the Material UI components.
Install these packages by running the following command in your terminal:
npm install [@mui](/@/mui)/material [@emotion](/@/emotion)/react [@emotion](/@/emotion)/styledThe [@emotion](/@/emotion)/react and [@emotion](/@/emotion)/styled packages are necessary for Material UI’s styling to work. Once installed, you can start using Material UI components in your project.
Step 2: Create the Basic Form
Now, we’ll set up a basic form in App.js with:
- An input field for the Chess.com username.
- An input field for the year and month.
- A button to fetch games.
Replace the content of src/App.js with the following:
import React, { useState } from 'react';
import { TextField, Button, Container, Typography, Box } from '[@mui](/@/mui)/material';

function App() {
  const [username, setUsername] = useState(''); // State to store the Chess.com username
  const [year, setYear] = useState(new Date().getFullYear()); // State to store the year, defaults to the current year
  const [month, setMonth] = useState(new Date().getMonth() + 1); // State to store the month, defaults to the current month

  // Function to handle the fetching of games
  const fetchGames = () => {
    console.log(`Fetching games for ${username} from ${year}-${month}`); // Logs the form values to the console
  };

  return (
    <Container>
      {/* Title for the application */}
      <Typography variant="h4" gutterBottom>
        Chess.com Game Fetcher
      </Typography>

      {/* Container for inputs and button aligned in a row */}
      <Box display="flex" justifyContent="flex-start" alignItems="center" gap={2} style={{ marginTop: '20px' }}>
        {/* Input for Chess.com username */}
        <TextField
          label="Chess.com Username"
          variant="outlined"
          value={username}
          onChange={(e) => setUsername(e.target.value)} // Updates the username state
        />

        {/* Input for year */}
        <TextField
          label="Year"
          variant="outlined"
          type="number"
          value={year}
          onChange={(e) => setYear(e.target.value)} // Updates the year state
        />

        {/* Input for month */}
        <TextField
          label="Month"
          variant="outlined"
          type="number"
          value={month}
          onChange={(e) => setMonth(e.target.value)} // Updates the month state
        />

        {/* Button to fetch games */}
        <Button
          variant="contained"
          color="primary"
          onClick={fetchGames} // Calls fetchGames when clicked
        >
          Fetch Games
        </Button>
      </Box>
    </Container>
  );
}

export default App;
Step 3: Understanding the Code
- Container: A Material UI layout component that centers content and adds padding.
- Typography: Styles text elements like headings. Used for the title “Chess.com Game Fetcher.”
- TextField: Input components for:
- Chess.com username.
- Year (defaults to the current year).
- Month (defaults to the current month).
- Button: Triggers the
fetchGamesfunction when clicked. - useState Hooks:
username: Stores the entered Chess.com username.year: Stores the year for the game archive.month: Stores the month for the game archive.
- fetchGames Function: Logs the entered
username,year, andmonthvalues to the console. Will later fetch data from the Chess.com API.
Step 4: Preview the Form
Save your changes and check the browser. You should see:
- A title labeled “Chess.com Game Fetcher.”
- Three input fields for the username, year and month.
- A button labeled “Fetch Games.”

At this stage, you’ve built a functional form using Material UI. In the next section, we’ll connect this form to the Chess.com API to fetch and display game data.
Fetching and Displaying Games
In this section, we’ll integrate the Chess.com API into our React application. The goal is to fetch a list of chess games for a specific player, process the data to extract essential details, and display the information in a structured format using a Material UI Table.
We’ll also learn how to clean PGN (Portable Game Notation) data to extract bare moves without metadata, comments, or move numbers for a clean display.
Step 1: Understand the Chess.com API Endpoint
The Chess.com API provides access to historical game data for users. The endpoint we’re using retrieves monthly games for a specified player.
Endpoint:
https://api.chess.com/pub/player/{username}/games/{year}/{month}Key Parameters:
{username}: The Chess.com username.{year}and{month}: The year and month for the games to fetch.
The response includes metadata (like players’ ratings and results) and the full PGN for each game.
Step 2: Fetch Games from the Chess.com API
To fetch the data, we’ll:
- Dynamically construct the API URL based on user input (username, year, and month).
- Use the Fetch API to make a GET request.
- Parse the JSON response and store the games in a state variable.
Here’s the function:
const fetchGames = async () => {
  if (!username || !year || !month) {
    alert("Please provide a username, year, and month."); // Validate input.
    return;
  }

  // Construct the API URL dynamically based on input
  const url = `https://api.chess.com/pub/player/${username}/games/${year}/${month}`;

  try {
    const response = await fetch(url); // Fetch data from Chess.com API
    const data = await response.json(); // Parse the JSON response

    if (data.games) {
      setGames(data.games); // Store the games in the state if available
    } else {
      alert("No games found for the specified period.");
    }
  } catch (error) {
    console.error("Error fetching games:", error); // Log any errors
    alert("Failed to fetch games. Please try again.");
  }
};
Step 3: Extract Bare Moves from PGN
The PGN data often includes metadata, move numbers, and comments, which can clutter the display. To clean this data, we’ll use the following function to extract only the moves:
const extractMoves = (pgn) => {
  // Remove metadata lines (lines that start with [ and end with ])
  const noMetadata = pgn.replace(/^\[.*\]$/gm, '');

  // Remove comments inside {}
  const noComments = noMetadata.replace(/\{.*?\}/g, '');

  // Remove move numbers (e.g., "1.", "1...")
  const noMoveNumbers = noComments.replace(/\d+\.+/g, '');

  // Clean up extra spaces and return
  return noMoveNumbers.trim().replace(/\s+/g, ' '); // Replace multiple spaces with a single space
};
This function ensures that only the bare moves are displayed in a clean, human-readable format.
Step 4: Display Games in a Table
We’ll use Material UI’s Table component to display the fetched games. Each row will represent a single game, showing key details like the players, results, and bare moves.
Here’s the code:
<Table>
  <TableHead>
    <TableRow>
      <TableCell>White</TableCell> {/* Column for the White player's name and rating */}
      <TableCell>Black</TableCell> {/* Column for the Black player's name and rating */}
      <TableCell>Result</TableCell> {/* Column for the game result */}
      <TableCell>Moves</TableCell> {/* Column for the extracted moves */}
    </TableRow>
  </TableHead>
  <TableBody>
    {games.map((game, index) => (
      <TableRow key={index}> {/* Unique key for each row */}
        {/* White player details */}
        <TableCell>
          {game.white.username} ({game.white.rating})
        </TableCell>
        {/* Black player details */}
        <TableCell>
          {game.black.username} ({game.black.rating})
        </TableCell>
        {/* Game result */}
        <TableCell>
          {game.white.result === "win"
            ? "White Wins"
            : game.black.result === "win"
            ? "Black Wins"
            : "Draw"}
        </TableCell>
        {/* Extracted moves */}
        <TableCell>
          <pre style={{ whiteSpace: "pre-wrap", wordWrap: "break-word" }}>
            {extractMoves(game.pgn)} {/* Display the clean moves */}
          </pre>
        </TableCell>
      </TableRow>
    ))}
  </TableBody>
</Table>
Final Code
Here’s the complete implementation:
import React, { useState } from "react";
import {
  TextField,
  Button,
  Container,
  Typography,
  Box,
  Table,
  TableBody,
  TableCell,
  TableHead,
  TableRow,
} from "[@mui](/@/mui)/material";

function App() {
  const [username, setUsername] = useState(""); // State for the username input
  const [year, setYear] = useState(""); // State for the year input
  const [month, setMonth] = useState(""); // State for the month input
  const [games, setGames] = useState([]); // State to store fetched games

  // Fetch games from the Chess.com API
  const fetchGames = async () => {
    if (!username || !year || !month) {
      alert("Please provide a username, year, and month."); // Validate input
      return;
    }

    const url = `https://api.chess.com/pub/player/${username}/games/${year}/${month}`;

    try {
      const response = await fetch(url); // Fetch data from Chess.com API
      const data = await response.json(); // Parse the JSON response

      if (data.games) {
        setGames(data.games); // Store the games in the state if available
      } else {
        alert("No games found for the specified period.");
      }
    } catch (error) {
      console.error("Error fetching games:", error); // Log errors
      alert("Failed to fetch games. Please try again.");
    }
  };

  // Function to clean and extract bare moves from PGN
  const extractMoves = (pgn) => {
    const noMetadata = pgn.replace(/^\[.*\]$/gm, ''); // Remove metadata
    const noComments = noMetadata.replace(/\{.*?\}/g, ''); // Remove comments
    const noMoveNumbers = noComments.replace(/\d+\.+/g, ''); // Remove move numbers
    return noMoveNumbers.trim().replace(/\s+/g, ' '); // Clean up extra spaces
  };

  return (
    <Container>
      <Typography variant="h4" gutterBottom>
        Chess.com Game Viewer
      </Typography>

      {/* Input Form */}
      <Box display="flex" gap="16px" marginBottom="20px">
        <TextField
          label="Username"
          value={username}
          onChange={(e) => setUsername(e.target.value)}
        />
        <TextField
          label="Year"
          value={year}
          onChange={(e) => setYear(e.target.value)}
        />
        <TextField
          label="Month"
          value={month}
          onChange={(e) => setMonth(e.target.value)}
        />
        <Button variant="contained" onClick={fetchGames}>
          Fetch Games
        </Button>
      </Box>

      {/* Games Table */}
      {games.length > 0 && (
        <Table>
          <TableHead>
            <TableRow>
              <TableCell>White</TableCell>
              <TableCell>Black</TableCell>
              <TableCell>Result</TableCell>
              <TableCell>Moves</TableCell>
            </TableRow>
          </TableHead>
          <TableBody>
            {games.map((game, index) => (
              <TableRow key={index}>
                <TableCell>
                  {game.white.username} ({game.white.rating})
                </TableCell>
                <TableCell>
                  {game.black.username} ({game.black.rating})
                </TableCell>
                <TableCell>
                  {game.white.result === "win"
                    ? "White Wins"
                    : game.black.result === "win"
                    ? "Black Wins"
                    : "Draw"}
                </TableCell>
                <TableCell>
                  <pre style={{ whiteSpace: "pre-wrap", wordWrap: "break-word" }}>
                    {extractMoves(game.pgn)}
                  </pre>
                </TableCell>
              </TableRow>
            ))}
          </TableBody>
        </Table>
      )}
    </Container>
  );
}

export default App;
Explanation:
- The app allows users to fetch chess games from Chess.com by entering a username, year, and month.
- It uses React’s
useStateto manage user inputs and the fetched game data dynamically. - A
fetchGamesfunction retrieves games from Chess.com’s API, constructs the API URL based on user inputs, and handles errors gracefully. - The
extractMovesfunction processes the game’s PGN (Portable Game Notation) to extract and clean just the chess moves, removing metadata, comments, and move numbers. - The interface is built with Material UI, featuring input fields for user data, a fetch button, and a table for displaying the results.
- The games are displayed in a structured table, showing details like players, their ratings, the game result, and the extracted chess moves.
- The app dynamically updates and displays game data based on user input, providing a clean, responsive user experience.
You should now see the following: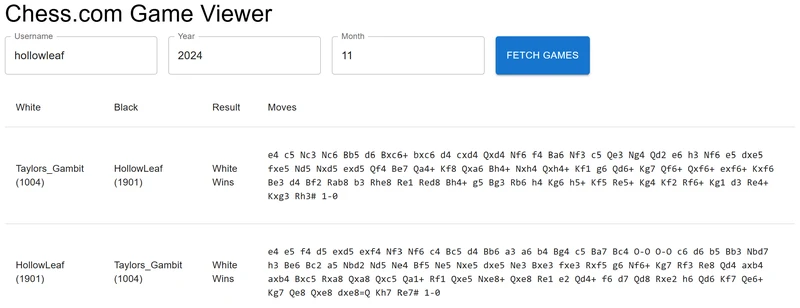
Formatting Our Output
In this section, we’ll enhance the game viewer by integrating key features into our app. These include rendering chessboards with the final game positions using react-chessboard, extracting moves, and adding detailed game data.
Key Goals:
- Use
react-chessboardto display the final position of games. - Extract clean move sequences from PGN files.
- Enhance the game table with FEN-calculated chessboards and game details.
Step 1: Install Required Libraries
To achieve our goals, we need two additional libraries:
react-chessboardfor rendering the chessboard.chess.jsfor calculating the FEN (Forsyth-Edwards Notation) of a game from its moves.
Install both libraries with the following command:
npm install react-chessboard chess.jsAfter installation, import the required components into your file:
import { Chessboard } from "react-chessboard"; // For chessboard rendering
import { Chess } from "chess.js"; // For FEN calculation
Step 2: Calculate FEN from PGN
The calculateFenFromMoves function takes a PGN (Portable Game Notation) string, cleans it to extract moves, and uses chess.js to compute the FEN of the final position. This FEN is used to render the chessboard.
Here’s the function:
const calculateFenFromMoves = (pgn) => {
  const chess = new Chess(); // Initialize a new Chess.js instance
  const cleanMoves = extractMoves(pgn); // Extract clean moves from PGN (previously defined)
  chess.loadPgn(cleanMoves); // Load moves into Chess.js
  return chess.fen(); // Return the FEN of the final position
};
Step 3: Fetch Games and Limit Results
We’ll update the fetchGames function to:
- Fetch games from the Chess.com API.
- Calculate the FEN for each game’s final position.
- Limit the number of games displayed to the first 50 for performance.
- Handle invalid games gracefully by skipping them. (This will handle the cases where you start the game from a specific position)
Here’s the updated function:
const fetchGames = async () => {
  if (!username || !month || !year) {
    alert("Please provide username, year, and month."); // Validate inputs
    return;
  }

  const url = `https://api.chess.com/pub/player/${username}/games/${year}/${month}`;

  try {
    const response = await fetch(url); // Fetch games from Chess.com API
    const data = await response.json(); // Parse JSON response

    const gamesWithFen = (data.games || [])
      .slice(0, 50) // Limit to the first 50 games
      .reduce((acc, game) => {
        try {
          const finalFen = calculateFenFromMoves(game.pgn); // Calculate FEN
          acc.push({
            ...game,
            finalFen, // Attach FEN to the game object
          });
        } catch (error) {
          console.warn(`Skipping invalid game with PGN: ${game.pgn}`, error); // Skip invalid games
        }
        return acc;
      }, []);

    setGames(gamesWithFen); // Update state with valid games
  } catch (error) {
    console.error("Error fetching games:", error); // Log fetch errors
    alert("Failed to fetch games. Please try again.");
  }
};
Step 4: Update the Game Table
We’ll now display the fetched games in a table. Each row will show:
- A chessboard displaying the game’s final position.
- Game details, including players, ratings, results, date, and move list.
Here’s the code to render the table:
{games.length > 0 && (
  <Table sx={{ marginTop: 3 }}>
    <TableBody>
      {games.map((game, index) => (
        <TableRow key={index}>
          {/* Chessboard Column */}
          <TableCell>
            <Chessboard
              position={game.finalFen || "start"} // Display final position or default to start
              arePiecesDraggable={false} // Disable piece dragging
              boardWidth={200} // Set board size
            />
          </TableCell>

          {/* Game Details Column */}
          <TableCell>
            <Box sx={{ display: "flex", flexDirection: "column", gap: 1 }}>
              <Typography variant="h6">
                {game.white.username || "Anonymous"} ({game.white.rating}) vs{" "}
                {game.black.username || "Anonymous"} ({game.black.rating})
              </Typography>
              <Typography variant="body1">
                Result:{" "}
                {game.white.result === "win"
                  ? "White Wins"
                  : game.black.result === "win"
                  ? "Black Wins"
                  : "Draw"}
              </Typography>
              <Typography variant="body2">
                Date: {new Date(game.end_time * 1000).toLocaleString()}
              </Typography>
              <Typography variant="body2" sx={{ whiteSpace: "pre-wrap" }}>
                Moves: {extractMoves(game.pgn)}
              </Typography>
            </Box>
          </TableCell>
        </TableRow>
      ))}
    </TableBody>
  </Table>
)}
Final Code
Here’s the complete app code after implementing all steps:
import React, { useState } from "react";
import {
  TextField,
  Button,
  Container,
  Typography,
  Box,
  Table,
  TableBody,
  TableCell,
  TableRow,
} from "[@mui](/@/mui)/material";
import { Chess } from "chess.js";
import { Chessboard } from "react-chessboard";

// Function to clean and extract bare moves from PGN
const extractMoves = (pgn) => {
  const noMetadata = pgn.replace(/^\[.*\]$/gm, ""); // Remove metadata
  const noComments = noMetadata.replace(/\{.*?\}/g, ""); // Remove comments
  const noMoveNumbers = noComments.replace(/\d+\.+/g, ""); // Remove move numbers
  return noMoveNumbers.trim().replace(/\s+/g, " "); // Clean up extra spaces
};

// Function to calculate FEN from moves
const calculateFenFromMoves = (pgn) => {
  const chess = new Chess(); // Initialize Chess.js instance
  const cleanMoves = extractMoves(pgn); // Extract clean moves (defined above)
  chess.loadPgn(cleanMoves); // Load moves into Chess.js
  return chess.fen(); // Return the FEN of the final position
};

function App() {
  const [username, setUsername] = useState("");
  const [month, setMonth] = useState("");
  const [year, setYear] = useState("");
  const [games, setGames] = useState([]);

  const fetchGames = async () => {
    if (!username || !month || !year) {
      alert("Please provide username, year, and month."); // Validate inputs
      return;
    }

    const url = `https://api.chess.com/pub/player/${username}/games/${year}/${month}`;

    try {
      const response = await fetch(url); // Fetch games from Chess.com API
      const data = await response.json(); // Parse JSON response

      const gamesWithFen = (data.games || [])
        .slice(0, 50) // Limit to the first 50 games
        .reduce((acc, game) => {
          try {
            const finalFen = calculateFenFromMoves(game.pgn); // Calculate FEN
            acc.push({
              ...game,
              finalFen,
            });
          } catch (error) {
            console.warn(`Skipping invalid game with PGN: ${game.pgn}`, error);
          }
          return acc;
        }, []);

      setGames(gamesWithFen); // Update state with valid games
    } catch (error) {
      console.error("Error fetching games:", error); // Log fetch errors
      alert("Failed to fetch games. Please try again.");
    }
  };

  return (
    <Container>
      <Typography variant="h4" gutterBottom>
        Chess.com Game Viewer
      </Typography>
      <Box sx={{ display: "flex", gap: 2, marginTop: 3 }}>
        <TextField
          label="Username"
          value={username}
          onChange={(e) => setUsername(e.target.value)}
        />
        <TextField
          label="Year"
          value={year}
          onChange={(e) => setYear(e.target.value)}
        />
        <TextField
          label="Month"
          value={month}
          onChange={(e) => setMonth(e.target.value)}
        />
        <Button variant="contained" onClick={fetchGames}>
          Fetch Games
        </Button>
      </Box>
      {games.length > 0 && (
        <Table sx={{ marginTop: 3 }}>
          <TableBody>
            {games.map((game, index) => (
              <TableRow key={index}>
                <TableCell>
                  <Chessboard
                    position={game.finalFen || "start"}
                    arePiecesDraggable={false}
                    boardWidth={200}
                  />
                </TableCell>
                <TableCell>
                  <Box sx={{ display: "flex", flexDirection: "column", gap: 1 }}>
                    <Typography variant="h6">
                      {game.white.username || "Anonymous"} ({game.white.rating})
                      vs {game.black.username || "Anonymous"} (
                      {game.black.rating})
                    </Typography>
                    <Typography variant="body1">
                      Result:{" "}
                      {game.white.result === "win"
                        ? "White Wins"
                        : game.black.result === "win"
                        ? "Black Wins"
                        : "Draw"}
                    </Typography>
                    <Typography variant="body2">
                      Date: {new Date(game.end_time * 1000).toLocaleString()}
                    </Typography>
                    <Typography
                      variant="body2"
                      sx={{ whiteSpace: "pre-wrap" }}
                    >
                      Moves: {extractMoves(game.pgn)}
                    </Typography>
                  </Box>
                </TableCell>
              </TableRow>
            ))}
          </TableBody>
        </Table>
      )}
    </Container>
  );
}

export default App;
Explanation:
- Chessboard Rendering: Uses
react-chessboardto display the final position of each game. - Move Extraction: Extracts and cleans up moves from the PGN format.
- FEN Calculation: Utilizes
chess.jsto calculate the FEN for the final game position. - Error Handling: Skips invalid games and logs a warning without stopping the app.
- Game Table: Displays a user-friendly table with chessboard visuals, player details, results, and moves.
You should now see the following: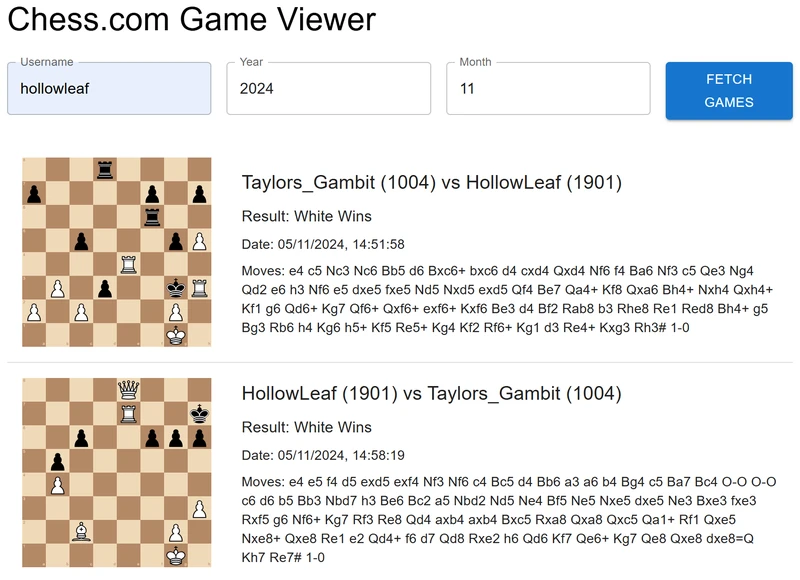
Summary
In this blog, we dove into the fascinating intersection of chess and web development by building a React application powered by the Chess.com API. We began by understanding the API’s capabilities and how it allows us to fetch detailed data about users’ games. Leveraging this data, we developed an interactive application that displays user-specific chess games in a visually engaging and organized format.
Using react-chessboard, we rendered the final positions of games directly on the interface, while Material UI helped us structure and style the data for clarity and responsiveness. Our application features a two-column layout: one side displays the final position of each game on a chessboard, while the other provides detailed game information, including player names and ratings, game results, dates, and a list of moves extracted from the PGN. Along the way, we emphasized best practices, such as efficient data processing, robust error handling, and clean presentation.
This project demonstrates how to combine chess knowledge with modern web technologies to create a practical and aesthetically pleasing application. Whether you’re interested in building tools for game analysis, exploring educational chess applications, or creating personalized chess visualizations, the skills and techniques covered here serve as a strong foundation. The chessboard is just the start—your creativity can take this application in countless exciting directions. Let your passion for chess and coding inspire your next project!
Learn More
Here are the tools and resources we used in this article to build our Lichess game viewer application. Each of these is essential for recreating and understanding the project:
Visual Studio Code: We used VS Code as our code editor throughout this project. It’s a powerful tool for coding, debugging, and managing projects. Download it to streamline your development workflow.
Lichess API: The Lichess API is the backbone of this project, providing access to chess game data. Explore its extensive capabilities and learn how to fetch games, puzzles, and more.
React: React is the framework we used to build this dynamic and interactive application. Learn how to create components, manage state, and build engaging user interfaces.
Material UI: Material UI is the library we used to style the application and create components like tables, text fields, and buttons. Explore its components and theming options to enhance your React apps.
react-chessboard: This library allowed us to display the final position of games as a static chessboard. Learn how to use it to create visually appealing chessboard components in your applications.
Leave a Reply